
How to Build a Notion Client Portal in 2026 (Step by Step)
Build a Notion client portal step by step: client database, filtered views, row-level permissions on Business, client forms, and the real limits.
You have eight clients, and every one of them emails you the same three questions. Where are we on the deliverable, did you get my file, and what does this invoice cover. You answer each one individually, from memory, and then you do it again next week.
A client portal fixes that by giving each client one page they can open themselves. Notion is a reasonable place to build it, because you are probably already keeping the project notes, the file list and the invoice tracker there. The portal is mostly a permissions exercise on top of work you have already done.
The hard part is not building the page. It is making sure that when your client opens it, they see their own row and nothing else. Most guides on how to create a client portal in Notion still say it cannot be done. As of 2026 it can, and this walks through exactly how.
What a Notion Client Portal Actually Is
A Notion client portal is a page you share with someone outside your workspace, containing filtered views of your own databases. Your client sees a project tracker, a file list and an invoice log. They do not see the workspace those things live in.
Nothing about it is a separate Notion product. There is no portal feature to switch on. You build it out of pages, databases, filtered views and sharing rules, which means the quality of the portal comes down to how carefully you set the permissions.
That framing matters because it sets your expectations correctly. You are not buying a client-facing app with a login screen, branded emails and download tracking. You are giving someone controlled access to part of your workspace, and it will look and behave like Notion.
What You Need Before You Start
Two things decide whether a Notion client portal will work: which plan you are on, and how many external people you need to let in. Guests are the people you invite to specific pages rather than to your whole workspace, and they are what your clients will be.
Guests are free. You pay for members, the people inside your organization, and never for the clients you invite. That is the single most useful pricing fact for this project, and it means a portal for thirty clients costs the same as a portal for three.
What does change with your plan is the guest ceiling and the permission depth:
Plan | Price per member/month | External guest limit | Row-level database permissions |
|---|---|---|---|
Free | $0 | 10 | No |
Plus | $10 billed yearly | Unlimited | No |
Business | $20 billed yearly | Unlimited | Yes |
Enterprise | Custom | Unlimited | Yes |
Prices are the annual rates read off Notion's pricing page. If you have seen older guides quoting caps of 100 guests on Plus and 250 on Business, those numbers are out of date; the live page now says unlimited on all three paid tiers.
The Business row is the one that decides your architecture. Without row-level permissions you will be duplicating a page for every client by hand, and with them you can run every client off one shared database. Start on Free if you are testing with two clients, and understand that the real portal begins at Business.
Companies young enough to qualify for Notion's startup program can reach that tier for a lot less than list price, which is worth checking before you commit, as we cover for early-stage teams.
Step 1: Build the Client Database
Everything hangs off one database where each row is a client. Get this right and the rest is filtering.
- Create a database called Clients, with the title property holding the client or company name.
- Add a Person property called Client Contact. This is the property your permission rules will read, so it is not optional.
- Add the properties you actually track: Status, Retainer Value, Start Date, Account Owner.
- Create the supporting databases (Deliverables, Files, Invoices) and give each a Relation property pointing back to Clients.
- Open one client row and check that its related deliverables and invoices appear on the page.
The Person property is the piece people skip. A text field holding your client's name will not work, because Notion's permission rules can only read a Person or Created-by property. Your client has to be an actual Notion user occupying that field.
Build the supporting databases before you start filtering anything, because retrofitting a Relation across a hundred existing rows is far slower than adding it on day one. Status changes and date stamps can be handed off to Notion's own automations once the structure settles.
Step 2: Give Each Client Their Own Page
Each row in your Clients database is already a page. That page is the portal. Open it and build the layout your client will see: a short summary at the top, then the views they need underneath.
Add linked views of your Deliverables, Files and Invoices databases to the page, and filter each one to that client. A linked view shows the same underlying data as the source database while letting you sort and filter it differently, which is exactly what a portal needs.
Set every client-facing view to the properties you want visible. Hide your internal margin field, your account notes, and anything you would not say to the client's face. Hiding a property in a view is a display choice rather than a security control, which is why the next step exists.
Step 3: Lock Down What Clients Can See
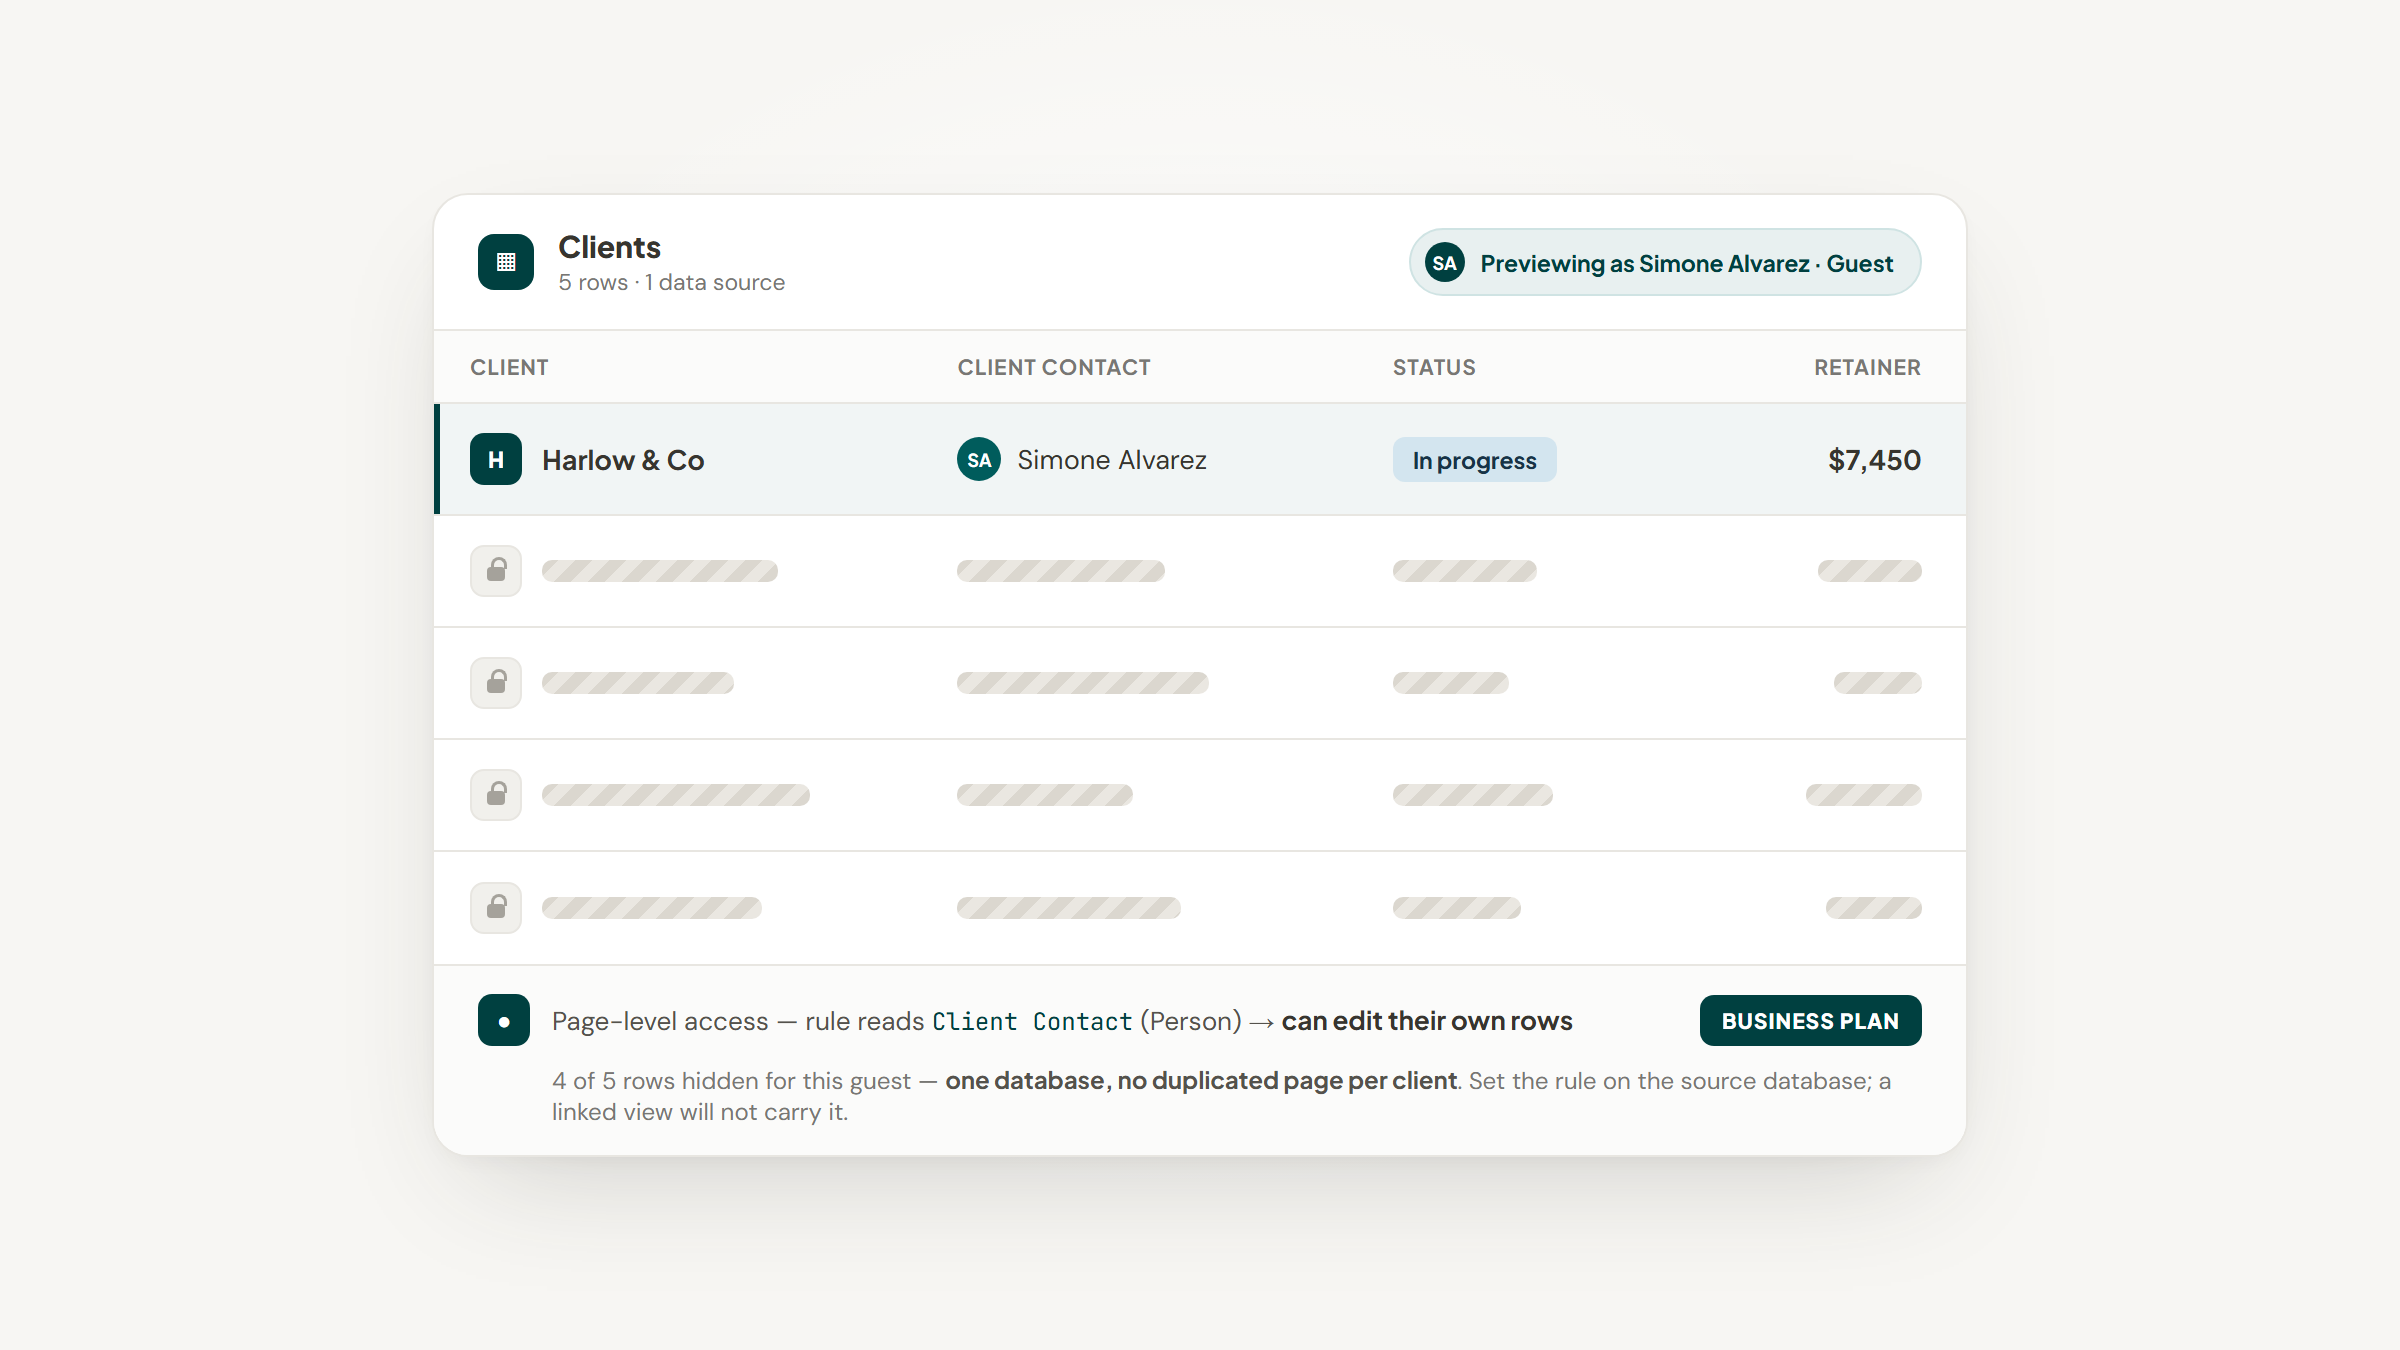
This is the step that separates a portal from a shared folder, and it is where Notion changed. On the Business plan you can grant access based on who is named in a Person property, so a client reaches their own row and no others.
Security people call this least privilege, which NIST defines as restricting a user's access privileges to the minimum necessary to accomplish assigned tasks. A portal is that principle applied to a spreadsheet: your client needs one row, so give them one row.
To create the rule:
- Open the source database, not a linked view of it. Rules set on a linked view will not apply.
- Click Share at the top of the database.
- Under Page-level access, select Add a new rule.
- Select your Client Contact person property, or a Created-by property.
- Choose the access level you want that person to have on their own rows.
- Select Create rule.
The rule now applies across every view of that database, including linked views elsewhere in your workspace. If your database draws on multiple data sources, each source carries its own rules, and you switch between them in the same Share menu.
One caveat worth stating plainly: Notion notifies people by default when they are added to a person property. If you are backfilling a hundred existing rows, expect a hundred notifications to go out unless you change that setting first.
Three Permission Traps That Quietly Break Portals
A rule that reads correctly in the Share menu can still fail in practice. Notion documents three behaviors that catch people out, and none of them appear in the roundups covering this topic.
A client with no database access cannot browse to their row. Page-level access grants them the row, not a route to it. They reach it through the assignment notification in their Notion inbox, or through a linked view sitting on a page you have shared with them. Build that linked view; do not assume they will find the row.
Page-level access cannot create pages. A client who only has access through a permission rule can read and edit their own rows and nothing else, which means they cannot add a new request, file or comment thread as a database entry. Creating things requires a form, covered in the next step.
The broadest access wins. If your client is also a workspace member with full access to that database through a teamspace, your carefully scoped rule is silently overridden and they see everything. Before you trust a portal, check the whole Share menu rather than just the rule you wrote.
The first trap is the one a consultant building exactly this setup ran into on Reddit, where the top reply warned that a client template built on linked view databases forces you to restrict page access heavily to stop the client manipulating the underlying data. That is one thread rather than evidence of a pattern, and two other commenters replied that they wanted to know the answer too. Test with a real second account before you invite anyone.
Step 4: Let Clients Send You Things
A portal that only broadcasts is a status page. The moment a client wants to file a request or upload a brief, you need a way in that does not involve giving them database access.
Notion forms are the answer. Create a form that writes into your Deliverables or Requests database, share the form link on the client's portal page, and their submission becomes a row you control. The client never touches the database itself.
Set default values on the form where you can, so submissions arrive tagged to the right client and status. That saves you the triage step that otherwise eats the time the portal was supposed to save.
Forms are also where Notion's page-first design shows its seams, since a spreadsheet-first tool treats structured intake as the default rather than an add-on, a difference we work through in Airtable vs Notion.
What to Put in the Portal, and What to Leave Out
The instinct is to show clients everything, on the theory that transparency builds trust. In practice a page with forty properties and six views makes a client feel lost, and they email you anyway.
Nielsen Norman Group calls the alternative progressive disclosure: show only the few most important options first, and defer the specialized ones until someone asks. A client portal should open with the four things a client checks weekly, and put everything else one click deeper.
Here is a workable split for a service business:
Content | On the client page | Kept internal |
|---|---|---|
Deliverable status and next milestone | Yes | |
Uploaded files and final assets | Yes | |
Invoices, amounts, paid or unpaid | Yes | |
Meeting notes shared with the client | Yes | |
Internal margin, effort estimates, capacity | Yes | |
Account risk notes and renewal likelihood | Yes | |
Other clients' rows in the same database | Yes | |
Draft work not yet reviewed internally | Yes |
The right-hand column is the one to be strict about. A client seeing your margin on their own project is a conversation you do not want to have, and Notion's permission rules will not save you if you put that property on a view they can open.
Keeping the Portal Current Without Extra Work
A portal decays the moment updating it becomes a separate task. Clients notice a stale status faster than they notice a missing feature, and a page that lies is worse than no page.
The fix is to make updating the portal a side effect of work you already do rather than an additional habit. When you log a call, that log should land on the client's page automatically because it is stored on the row the page is built from.
This is the part we built Lead to Notion for. Our free Chrome extension opens beside whatever you are reading, and its Add note tab lets you search a client card by name, append a note, and move the card to a new stage without opening Notion. Every note is stamped with today's date, so the card body becomes a running log rather than a wall of undated text.
There is a checkbox on the same tab that sets Last contacted to today. Tick it as you write the note, surface that property on the client's portal view, and your client can see when you last spoke without asking. Neither step involves opening Notion or hunting for the right page.
Saving a lead the same way takes one short form, though the required fields are genuinely required: Website, LinkedIn URL, Deal Value, Service and Source all have to be filled before a card will save, and every card lands in the Lead stage regardless of where the relationship actually is. Connecting your database and matching your own column names is covered in our setup guide.
Being straight about what we are: Lead to Notion is a capture layer, not a CRM and not a portal. Notion holds the data, and we make getting data into it fast. We are also not in the Chrome Web Store yet, so installing means downloading a ZIP from GitHub, turning on Developer mode at `chrome://extensions`, and using Load unpacked. That is four clicks, and it is honest to say so rather than imply a one-click install.
What This Setup Cannot Do
Being clear-eyed here will save you from promising a client something Notion does not deliver. Four limits are worth knowing before you build.
There is no analytics layer. Notion does not tell you when a client opened the page, downloaded a file or read an update, so if your business depends on proving a deliverable was received, you need something else alongside it.
There is no branded login. Clients sign into Notion with a Notion account, see Notion's interface, and get Notion's emails. You can add your logo to the page; you cannot make the experience look like your company.
Client-side editing is coarse. A client either can edit their row or cannot. There is no field-level permission that lets them update a delivery address while leaving the invoice amount alone.
Scale gets awkward. One database with permission rules handles a lot, but the moment you need genuinely different layouts per client rather than different data, you are back to building pages by hand.
None of this makes Notion the wrong choice, but it does mean a client whose records already live in a dedicated sales CRM rarely needs a second copy here, a boundary we set out in our HubSpot walkthrough.
When to Use a Dedicated Portal Tool Instead
Notion is the right answer when your client work already lives there and your portal needs are mostly visibility. It stops being the right answer at a fairly predictable point.
Pick a purpose-built portal tool if you need a white-labeled experience with your own domain, per-file download tracking, client-specific billing flows, or dozens of near-identical portals that must stay in sync as you change the template. Those are the jobs Notion genuinely does not do, and paying for a tool that does them is cheaper than the workarounds.
Stay in Notion if you have somewhere between two and thirty clients, your team already documents in Notion, and what your clients actually want is to stop emailing you for status. That describes most consultancies and agencies, and it is worth building for. If your operations are spread across a work-management tool as well, the database and permissions differences are worth understanding before you commit a client-facing workflow to either one.
Build One Portal This Week, Not Eight
Build your first client portal in Notion for the client who emails you most, and give them nothing but a page. Filter their views, write the permission rule, test it from a second account, and send them the link with one sentence explaining what they will find.
Watch what they open, and what they still email you about, for two weeks. That tells you what belongs on the page far better than any template will, and the second portal takes twenty minutes instead of an afternoon.
Ship the smallest version and let real use shape it. A portal that covers four things your client checks weekly beats a complete one that arrives in November.
If the bottleneck is getting client and lead records into Notion in the first place, that is the part we handle. Download free, connect your database, and stop copy-pasting.
There is no plan to pick and no card to enter, because Lead to Notion is free forever and stores your Notion token on your own device.
Frequently asked questions
Build a Clients database where each row is a client and one property is a Person field holding that client's Notion account. Add linked views of your deliverables, files and invoices to the client's row page, filtered to them. Then open the source database, go to Share, and add a page-level access rule that reads your Person property. The client's row page becomes their portal.
Turn Notion into your CRM
Lead to Notion is a free Chrome extension. Save leads to your Notion database in one click, add notes, and track your pipeline. No account, no server.